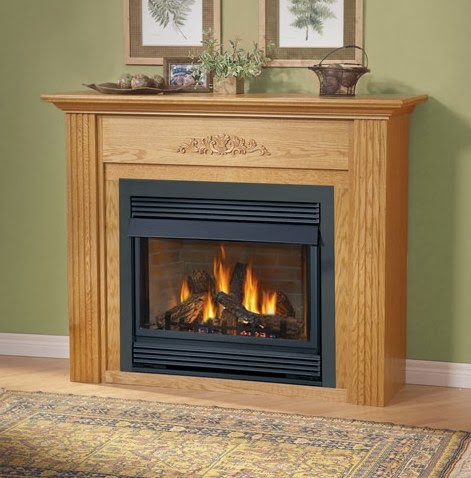
Monday, January 20, 2014

Installing your own Fireplace Insert - DIY Project

            If you’re looking to turn your old and drafty wood burning fireplace into a modern and efficient gas-powered fireplace, you’re in luck. Today we’ll be talking about how to install a fireplace insert to transform your fireplace into something that’s more eco-friendly, energy saving, and easy to maintain and use.

            Below, I’ve provided a step-by-step of how to install your new insert. If you think you might need some extra tools to help you get going, check out plumber’s stock for a large, discounted selection of HVAC equipment by clicking here. Keep in mind that this project will take you about 2 days to complete, so dedicate a weekend to work on it. Also keep in mind that when shopping for an insert, you’ll be looking to spend anywhere from $200 to $500.

1. Attach vent pipes – The first step in this installation process is to attach the vent pipes. You’ll want to use sheet metal screws to attach the vent pipes to the insert’s mounting plate. Make sure the exhaust pipe attaches to the exhaust outlet as well to decrease chance of carbon monoxide poisoning. 
2. Prep fireplace – Remove the existing fireplace damper and test fit the vent pipes into the chimney flue. Remove the ash cover to clear up space for the placement of your new insert. 
3. Install firebox – Attach the insert’s leveling legs and set the firebox in. Adjust the legs so the firebox is centered and level. 
4. Attach gas and electric lines – Since you’re going to be transforming an wood fireplace into a gas one, we’ll need to run gas and electric lines into the new insert. The gas will serve as the main fuel source while the electricity will work to power a fan. Please use caution, as working with gas and electricity is hazardous and can result in personal injury if done incorrectly. If you do not feel qualified to perform this step, call in a professional. 
5. Install the insert – Place the insert near the firebox and attach gas and electric lines to it according to the manufacturer’s instructions. Now slide the insert into the firebox, but be careful not to kink or bend the gas line. Position the mounting plate with the slots on top of the insert, lining up the vent pipes with the holes on the insert. Secure the sliding plate to the insert using a self-tapping screw. If necessary, adjust the leveling legs once more to make sure the entire unit is level. 
6. Accessories – This is easily my favorite part of the whole process, as you get to be creative about how you want your fire to look. Unhook the retaining clips from the bottom of the glass panel and carefully remove the glass. Place the embers inside the fireplace, spaced about ½ an inch apart. Place any larger pieces near the base to make the fire look more realistic. Scatter the ash around the edges of the burner plate, then place the ceramic logs inside. Replace the glass panel and clips. 
7. Install the receiver – Follow the manufacturer’s instructions to install the receiver for the remote control. Place the receiver outside the firebox to protect it from heat, then do a test run to make sure all the components are working. 
8. Install the surround – Last step! Slide the surround over the two tabs on the top of the fireplace unit. Use screws and attach the surround at the base of the insert. Install the screen over the surround’s glass front.

That’s all there is to it. A new and beautiful gas-powered fireplace is within your reach waiting for you to enjoy.

Tuesday, December 31, 2013

Kitchen Cabinetry - The Basics

            Your kitchen is a place where people gather together and make memories and food. It’s a place of comfort and warmth, fun and learning. Because your kitchen is such an important part of your home life, it should be a haven, a place where one can feel comfortable and which accurately reflects your (or your family’s) personality.

            One of the best ways to go about doing this is to have a nice looking kitchen. Cabinets tend to be the first thing people notice, followed by size and appliances. If you don’t like the way your kitchen looks now, try giving it a makeover. Today’s mini-DIY project focuses on your cabinets.

            If you don’t have enough money right now, it’s not a wise idea to try and switch out your cabinets, even if you dislike them. Instead, start with something smaller to change your kitchen’s look and feel a little bit.

            Changing your cabinet’s door handles can be a great way to personalize your kitchen and make it something more of what you want. There are many different styles of handle out there, and what you choose is entirely based on you. You could go with traditional and scour antique shops for the right vintage handle, or you could go sleek and modern and look for shiny chrome or stainless steel handles. You could go for whimsical and try and find unicorn, seahorse, or other animal handles. You could even go nerdy and look for Iron Man, Captain America, Superman, Batman, or other cool superhero or tv show logos.

            Regardless of what you pick, upgrading your cabinet’s handles can be a great way to personalize your kitchen while making it more of what you want it to be. This project can be done fairly quickly and requires little money and installation know-how.


            Have fun, be creative, and most importantly, happy holidays folks!

Tuesday, December 10, 2013

Why do my ducts need to be insulated?

            You may have heard of insulting your home to help keep the internal temperature stable during cold or hot months, but have you ever considered insulating your ducts? If you live in a newer home, your home might have already come with insulated ducts, but if it didn’t, consider the following information.

            Insulating your ducts is important because it’s used to provide better heating and cooling efficiency as well as prevent the duct from freezing during the cold winter months. Though insulation may sound like it’s only about keeping the warmth in, it’s also about keeping warmth out. On average, homes without insulated ducts see a 20% loss in efficiency when using their central heating or cooling. This means that 20% of the heated or cooled air is lost in leaks. This can add to an already high energy bill and if left unattended, this can result in disastrous wear and tear for the ducts as well as being unable to properly maintain the temperature in your home. But that’s only if you have a leak somewhere. If you don’t, you instead face the chance of accumulating condensation on the inside of the cut, which will eventually lead to rust and corrode you duct from the inside out. In either situation, if you’re using uninsulated ducts to transport air, you’ll have to eventually replace them.

            The good news is insulating duct isn’t expensive to purchase and install. By doing this, you skip over all the nasty consequences that may occur after years of use on your uninsulated ducts. Before you start surfing the web for insulated duct, let’s go over your situation.

            Start by considering your duct location. If there is a massive difference between the air that’s in the duct and the air that surrounds the duct, you’ll want to add insulation here. After you’ve mapped out these differences in temperature locations, consider what your duct itself is made of. Most commonly, you’ll see your duct is made of galvanized steel. Sometimes, the interior of these ducts are lined with insulation, typically 1” thick fiberglass. Take a peek inside these duct networks—if you notice they’re already lined, you don’t need to worry about insulting their exterior. If they’re not lined, then you have some choices on how to add insulation.

            If you’re planning on simply wrapping the exterior of the duct, all you need to do is purchase the insulation material. There are two general types of insulation wraps, insulation sleeves and fiberglass blanket wraps. Insulation sleeves come in a pre-measured length and may have one side that’s adhesive. Simply cut the sleeve to the proper length and wrap your duct within it. The other type of insulation wrap is the fiberglass blanket. With these, you literally just wrap it around the duct. If neither of these materials can be found at your local hardware store, try searching for foil-backed bubble wrap. Though this alternative won’t deliver the same type of insulation power and performance as the first two if you buy the cheap brands, this problem can be easily remedied by buying one of the more expensive brands.


            If that doesn’t sound to your liking, visit plumbersstock.com to browse their selection of insulating ducts. You may even choose to replace the entire duct itself with an insulated-interior duct. Whatever you choose, you won’t find it cheaper online anywhere else. 

Saturday, December 7, 2013

How to Care for and Maintain your AC

            Today, our city got blasted by a massive snowstorm. Cars were getting stuck, visibility was poor, and people were slipping and sliding all over the quickly-forming icy roads and sidewalks. At a time like this, the last thing anyone wants to think about is their AC unit. Why would you think about something that’s meant to keep you cold, right?

            Even during the frigid winter season, it’s a good idea to think about the coming spring and summer seasons. If your AC unit isn’t properly protected during these cold months, when summer rolls around, you’ll find yourself sweating and swearing as your AC unit refuses to work. During the winter, you should make sure your AC unit is properly protected against snowfall and debris. The best way to go about doing this is to cover up the outdoor unit with a tarp or some other sort of protective material. This will protect the unit from the harsh winter weather and allow it to last longer.

            Protecting your AC unit from the bad weather is only one aspect of properly caring for and maintaining your unit. The main kind of maintenance includes doing routine checkups on you AC during those hot summer months to ensure it’s working at full potential with the highest energy efficiency possible. When it comes down to maintenance, there are two big things you always want to check: filters and coils.

            Filters are a huge part of your AC unit, as they’ll filter out dust from the air to make every breath cleaner and healthier. If your filter is clogged or dirty, it’ll block the normal airflow and make the air that does come through polluted. Because of this, a dirty and clogged filter can reduce your system’s efficiency by as much as 15% and may cause respiratory problems or even asthma attacks to those that are sensitive to pollution.

            When you’re looking replace your filter (say the filter is too worn to be cleaned), consider buying reusable filters for your unit. If reusable, you’ll be able to save some money on buying new filters. If not, your filter will need to be replaced every month to two months while you’re using the AC.

            Another huge part of maintaining your AC unit is making sure the coils are in good shape. By this, I mean make sure the coils aren’t covered in dirt. If the coils become too dirty, they won’t be able to properly absorb heat from the atmosphere and your home won’t cool down as nicely. Additionally, dirty coils means you’ll have your AC on longer to try and cool down your home, which means a higher energy bill and bigger energy waste.

            To ensure your coils stay clean, check on them every month to two months. Since these coils are found on your AC unit outside, heavy sandstorms, dust storms, and even windstorms can add debris and dirt to them. If the environment outside is particularly dusty, take preventive measures to care for your AC unit. If the unit is near foliage, make sure the plants are trimmed back to allow 2 feet of space for the AC system.


            When you think it’s time to buy replacement parts, check plumbersstock.com for some great discounts on the tools and equipment you need: https://www.plumbersstock.com/category/8/hvac/

Saturday, November 30, 2013

Air Humidifiers: Unmasked!

A large population of people today live in dry, arid areas. In the United States alone, almost the entire western population lives in desert climates. We’re so used to living in these temperatures, we sometimes forget to think about the fact that humans are not meant to live in these sorts of environments without help. Sure, we can all adapt to varying climates, but dry air can take a serious toll on our bodies physically.

Since our bodies are made mostly of water, our bodies may be subject to adverse effects if we’re in dry temperatures too long. Things such as dehydration, itchy, dry skin, and even eczema are all side-effects you could experience if you move somewhere like Utah, Colorado, or Arizona.

Thankfully, there’s an easy way to counteract these effects. Besides lathering your skin with moisturizing lotion all day, you could increase the humidity level in your home.

How?
To give yourself a more balanced climate, consider investing in an air humidifier. Most people are under the impression that all air humidifiers do is increase humidity, but in reality, air humidifiers increase humidity, lower the air temperature, and improve your home’s overall air quality and circulation.

You may not be sure if you need an air humidifier. To help, I’ve made a short list of circumstances that have low humidity, so if any one of these environments sounds like the one you live in, you probably do.
·         Dry climate – I mentioned these already, but these are dry regions that don’t receive an abundance of rain, places like Arizona and Texas. In major cities, an air humidifier will also provide you relief from the surrounding air pollution.

·         Static – It’s interesting, but one of the leading causes of static is low humidity. If your home is constantly generating electric shocks, adding an air humidifier to your central home unit (or even a single room) will definitely help.

·         Obvious health symptoms – If you constantly get dry or chapped lips, coughs, have dry or itchy skin, or feel like your nose is irritated from the dry air, you need a humidifier.
·         Sickness – Often times, if you’re sick, your nose will become congested and your throat will feel dry, painful, and raspy. Having an air humidifier by you bedside during the length of your illness will soothe your symptoms.


    Types
      If you need an air humidifier, that doesn’t mean you’re limited to only a portable system. There are many different types of air humidifiers out there that are fit for every sort of budget and lifestyle. Depending on your specific circumstances, you may want a whole home unit (this works alongside your central heating and cooling system) or a portable unit that works for only a single room. Keep in mind the bigger the size, the bigger the price!

While all air humidifiers help when it comes to improving your home’s overall air quality, if you find yourself in a smoky home or area, or if you simply want your air filtered, an air humidifier can do that. Granted, a filtering air humidifier will cost more money, but it is an available option.

Regardless of what you’re looking for, Plumbersstock probably the air humidifier you need for a cheaper price than buying it elsewhere. To browse their selection, click here and you’ll be redirected.

Wednesday, November 27, 2013

Aluminum Backsplash: Give your Kitchen an Edge!

            After all the heavy subjects I’ve been pressing for the last few weeks, I wanted to take a break and talk about something fun and fresh! Aluminum and steel are stark, robust metals which can add a splash of vibrant décor to any kitchen. Today, I’m going to teach you all a quick weekend project that will be sure to leave your guests impressed the next time they come over. All you’ll need is a full day, a few spare bucks, and a creative mind! If you’re ready, let’s get started!

Sleek, beautiful, and very minimalistic. 

            This project offers full on creativity from the very start! Stainless steel and aluminum tiles can come in a huge array of finishes and designs, so pick the one you like best from a trusted home improvement or online source. Pick wisely, since these tiles will be the main attraction and eye-catcher. Start by printing off some pictures of potential steel designs. Place them up to the surface they’ll be covering and evaluate. How do they look? More importantly, how do they fit? You’ll want to be careful to cut through as little of the tiles as possible or the end result will look sloppy.

            Once you’ve got your tile of choice picked out and ready to go, use some glue to stick the tiles to the wall. All you need is a few dabs at each corner. If you so choose, leave some spaces between the tiles and grout them just like you would ceramic tiles. Not only does this add a professional and edgy look, but the caulk will help the tiles set better and more securely.

            And that’s it! All of a sudden you’ve transformed a drab and plain kitchen backwall into a fun and modern scene that’s sure to make a splash! To synchronize your new wall with your kitchen, consider putting out some stainless steel or chrome utensils, such as hanging pots and pans, utensils in a small utensil stand, or teapots. Make sure you don’t crowd the available space and lay out the objects sparingly. This will give your kitchen a minimalistic look while amping the modern feel.

            If you want some more in-depth information on exactly how to create your new backwall, click the following link: http://www.familyhandyman.com/kitchen/stainless-steel-kitchen-backsplash/view-all.

            Happy kitchen decorating!


Monday, November 25, 2013

Small Business Owners: Sloan Valve

            Let’s face it: if you’re the owner of a small or local business, you’ve got more to worry about than just inventory and finances. You’ve also got your plate full with trying to compete with the competition and keep your customers satisfied in every way possible. If your small business has a public restroom, that’s an extra sum of money and attention you’ll have to pay to the bathroom, since you’ll need to make sure everything is in good working order, refilled, and clean.

            But have you ever stopped and thought about possibly updating some of your old toilet or urinal fixtures with something more water conservative? If you have, that’s great! Saving water in your public restroom is a good idea for more than just the environment—your wallet will be happy as well! The biggest problem with getting those end results is being willing to invest in something that’s waterless now.

            If you’re like most people, you’re a little weary of trying something new. Most people like using the same technology that they’ve always used, because it’s understandable to them and familiar. Having a waterless fixture can be a scary choice to make, because you may not be sure if the invest will be worth it in the long run. However, before you rule out this option, think about this: Suppose you have a regular urinal. Suppose that every day, you have twelve men come through and use it. In one year, that would be the equivalent as using 6,500+ gallons of water or 24,800+ liters of water. If we were to replace that with a waterless urinal, this is the amount of water a year you would be SAVING.

            Let’s talk hygiene for a moment. You may be concerned that a waterless urinal would get dirty quicker and thus need to be cleaned more often. You may also be concerned that this sort of urinal would cause the odors from the urine to rise up and would stink up the rest of the bathroom. Although these are reasonable fears, this isn’t the case with Sloan waterless urinals. Sloan is a huge name on the market today for flush valves. If you’ve ever gone into a public restroom that has a manual flush valve, chances are it’s from Sloan. Even so, Sloan’s prized jewel comes in the shape of their waterless urinals. Unlike a generic urinal, these urinals are angles at such a way that gravity pulls the urine down and through the pipes. Although you may think that they would get dirty quicker, this has been shown to not get any dirtier than you average water-filled urinal. When it does get dirty, however, it can be cleaned like any other urinal.

            As for hygiene, the concern that the urine would raise up a disgusting scent is nearly non-existent for Sloan. Sloan uses what’s called a trap, which is really just a cup filled with water and oil and placed in the drain. When the urine flows past it, the urine sinks. Any of the urine’s associated gases then get stuck under the oil and are unable to rise. This makes for a very clean and hygienic solution to what otherwise would be a deal-breaker, even if it were conserving water.

            Even if you’re not interested in purchasing a waterless urinal, take a look at some other commercial plumbing fixtures here: https://www.plumbersstock.com/category/28/commercial/ for a chance to save big on anything else you may need, such as water faucets, soap dispensers, and soap refills.