Wednesday, May 7, 2014

Creating Snowflake Earrings. . . From Bubble Wrap

            So you ordered some things off Amazon and completely forget that Mother’s Day is coming up. You want to get your mom something nice, but unfortunately now you’re strapped for cash and all you’ve got at your disposal is a few dollars and some bubble wrap from your online order. What could you possibly do? Well, how about making some earrings using the bubble wrap? Yeah, they could look something like this:


            Pretty, right? It’s amazing that’s just bubble wrap (visit epbot.com for more beautiful and pretty DIY craft ideas by clicking on the image above)! Now, the material is more than just bubble wrap, it’s something known as FUSED bubble wrap, which is essentially bubble wrap and parchment paper. The process is fairly simple: just sandwich the bubble wrap between two sheets of parchment paper and iron the bejeezus out of them! Keep in mind that you’ll need to pop ALL the bubbles out of the bubble wrap first, and you’ll want to do this in a well-ventilated area to avoid breathing in the fumes. Additionally, you’ll want to iron it one layer at a time.

            When you’re done, you should have plastic that’s smooth but has a pretty, crackly look, similar to frosted glass.


            Now it’s time to make a trip to the craft store! You can purchase a snowflake punch for anywhere from $5-20, depending on the size of the punch. Make sure you buy a sturdy punch, as the plastic might be a bit tough to punch through right away! You can also pick up a small earring kit while you’re there which will cost you about $9. This will give you the dangle hooks for the earrings, as well as everything you need to assemble the earrings.

Use a thick needle to punch a hole through the top of the snowflake earrings so you can attach them to the earrings from the kit and voila! A mother’s day gift for under $30! Have fun!

Tuesday, April 15, 2014

Jetted Tubs - Ooh La La!

            I’ve always fantasized about owning a large home: A home that sat on an acre and a half of land with 6 bedrooms, 3+ bathrooms, large walk-in closets, a library, mini movie theater, game room, and heated indoor pool. I dream in silk and satin, luxury and riches, but I think half the fun is in honestly achieving one’s dream. Part of my dream house will one day include a jetted bathtub.

            For those of you who are like me, jetted bathtubs scream out “luxury!” This sort of bathtub truly stands out because they’re like a Jacuzzi, offering soft jets of water to gently massage sore spots and tension away. Jetted bathtubs are beautiful, but even just owning one in your own will enhance your home’s future market value.


You could make your bathroom look like this AND add value to your home? Why not? Click on the image above to browse a selection of premier jetted bathtubs. 


            The problem with owning a jet tub is in finding a GOOD jet tub. There are hundreds of different models out there from all sorts of respectable manufactures like American Standard, Aquatic, and Lasco, and with so many possibilities to choose from, finding the right one for your home can be difficult, time-consuming, and exhausting.

            THE PROCESS

            Before starting to sift through the models of jet tubs, first you’ll need to accurately measure all the dimensions and sizes of the location you plan on placing your tub in. For instance, if you plan on having this tub out on your deck you’ll need to consider the fact that the tub will need to be dropped in and will require at least half an inch of space around the tub. If, on the other hand, you plan on having this tub in your master bedroom, you’ll need to check size limits, weight limits (as needed when filled with water), and space limits. If you’re doing a remodel, this is especially important to consider because you’ll need to make sure to build around the size of the tub. In addition to the measurements you’ll need to take, you’ll also require proper wiring for this sort of tub. This can cause big problems if not considered before picking the location, or the problem may lie in your existing plumbing not working alongside this new investment.

Once you’ve gotten past the tedious initial first steps, you get to the fun part of choosing out the model. Your specific measurements and criteria will help eliminate many tubs from the list, and if you add to that a price limit, you’ll find yourself with fewer results to look through. Finally, you can also limit your search by selecting certain features. For instance, if you like taking baths and feel you would use your jet tub at least once a week, select for a model with more durable, powerful water jets. If you have a significant other you would want to share the experience with, select a whirlpool model that fits two people to ensure a romantic bathing experience. The final search criteria you should acknowledge to help filter out more results is the aesthetic look. What color(s) will it be? Will it fit in with your current home décor and design? Are you going for a contemporary, modern look or are you satisfied with the traditional oval shape? These sorts of things will help you pick out the best jet tub for your lifestyle, budget, space, and home.

To start browsing high quality jet tubs at discounted warehouse prices, visit Plumber’s Stock by clicking on the image above. 

Saturday, April 5, 2014

Faucet Parts: Your Showerhead

            In high school, I had this crazy friend that was a true social-bee. She was pretty and popular, and she just loved being invited over to people’s homes. Once inside the home, she would excuse herself and go the bathroom. In the bathroom, she would study the shower. She’d assign a numerical value to the shower (average showers would get a rating of 5, clean, organized, well-kept showers would get a 6, new high-tech showers would get a 9 or 10, and so on), and then if she thought the shower was particularly sophisticated or fancy, she would actually take a shower. I can’t tell you how weird the experience was, the first time I caught her doing this in our bathroom. I admit, there are much worse traits out there in friends, but this was probably one of the strangest I’ve encountered.

            I wanted to start off by sharing this memory with you all since today we’ll be talking about showerheads. Personally, I feel your home showerhead can say a lot about a person. It can tell you their preferences (simple or fancy), their budget, and even their likes if the showerhead comes with added features like being retractable or having more than one spray setting. My favorite types of showers are those that come from the same brand. For instance, if the shower is made entirely from components by Delta, I feel it could easily look like a model shower from a magazine.

            But I’m getting off topic. Showerheads. . . well, they may seem pretty basic and black & white, but there are a few shades of grey out there that can make your showerhead better suited for your needs and lifestyle. Here are a couple of common accessories and designs for your showerheads:

·        Slide Bar Hand Showers – If you’ve got a family, chances are there are varying heights in your household. A slide bar showerhead can be a good investment as it allows you to change the height at which the showerhead produces water. The showerhead is essentially placed on a bar which can be adjusted to the person’s specific height. Because of this, it gives you more flexibility and room to operate.  Since most slide bars systems come with their own showerhead, you can even purchase features like built-in massagers or varying spray settings to get everything you want in one tidy and neat package.


·        Single Function Rainshower Heads – If you find hand showers to be a hassle, there are more designs than just that for your showerhead. Single Function Rainshower Heads are one potential solution. These showerheads are beautiful in design and offer a simple, wide functionality that’s wrapped up in an elegantly sleek design. The biggest downside to these showerheads is that there just isn’t as much flexibility with moving them around, but the trade-off is you get a comfortable shower with self-pressurizing immersion.


·        Water Efficient Showerheads – This isn’t really a “design” as much as a bonus. If you’re looking to conserve water and improve your shower efficiency, consider one of these showerheads. More efficient and “green” than your other designs, these give you the peace of mind that you’re doing something great for the environment. Plus, they can even come with all the fun perks and features you love to personalize your showerhead!


Can’t decide? Who says you have to settle in for just one design for your shower and showerhead? Get creative and consider all the wonderful possibilities you could create to form your oasis of invigorating water relaxation. Make sure you visit Plumber’s Stock to find the products you’re looking for your shower when you’re ready, but for now, here’s some inspiration!


Saturday, March 15, 2014

Gas Grill: Summer BBQ Fun!

            We’re now blissfully in March, and each passing day brings us closer to summer!  Ah, summer. . . I can imagine it now, summer barbeques, pool parties, and jars of fresh, home-squeezed lemonade on my porch with a nice cool breeze as I watch my kids play through the sprinklers. Summer is probably my favorite season. That being said, with summer comes the all those fun barbeque parties with good food!

            In order to have a great barbeque, you need a great grill. If you’re like me, you own a small charcoal grill that you’re perfectly content with because, let’s face it, everything tastes better with that smokey flavor from charcoal. Even so, I still dream about those shiny silver grills with all the knobs and buttons and all that space for grilling hamburgers and steaks and chicken and hot dogs. . . maybe I’m a glutton, but if I am, at least I’m a happy one!


            Today I wanted to share with you all some tips on how to take care of your outdoor gas grill, if you happen to own one of these (if you don’t, you can always pick one up from Plumber’s Stock). An outdoor gas grill is such a large investment, you’ll definitely want to make sure you can make your grill last as long as possible. Here are some tips to keep your grill working to perfection:

            EVERY TIME TIPS:

·         Preheat your grill – Preheating your grill fully before putting food on there to cook cleans and disinfects your gas grill.
·         Brush the cooking grates to remove nasty, grimy residue and give yourself a clean cooking surface.
·         After you’re finished cooking, turn the grill to the max power setting to burn off the drippings and grease in the grill.
·         Cover the grill once it’s cooled down. This prevents contamination and rusting.

EVERY 10 COOKOUTS:

·         Remove the cooking grates and clean them out on both sides with warm water and a scrub. While the grates are out, clean off the metal barriers above the burners and below the grates.
·         Bush out the inside of the grill into the drip pan.
·         Clean out the grease drip pan (replace if necessary)
·         Put everything back once it’s clean and turn on the grill. Place the cover on and let the grill run for about 10 minutes to disinfect the interior. Keep the grill on until you see very little or no smoke coming out.

ONCE A YEAR:

·         Thoroughly brush out the interior of the grill, but leave the greasy accumulation as a protective layer on the metal.
·         Remove the barriers and cooking grates and clean them if they haven’t been cleaned recently. With everything out, turn up the heat just long enough to notice how the flames are coming from the burners. If the flames are uneven, you need to clean out the burners. HOW TO – Remove the affected burners from the grill and using a small wire or pipe cleaner, push through the ports (holes along the side). Gently tap the burners, open end down, on the ground to displace any debris from inside the burner. Once clean, replace the burners and heat up your grill again. If the flames are even, move on to the next step. If not, repeat.
·         Clean out the grease drip pan (or replace if necessary).
·         Close up the grill and give the exterior surface a clean wash.
·         Once all the components are clean, including the grates and barriers, put your grill back together and light it up, allowing the fire to disinfect the interior.
·         If you’re planning on putting your grill away for a long period of time (say, during the winter), close and disconnect the gas supply. Remove the propane tank from the grill and place it in a safe, ventilated area. Cover your grill and place it in a safe and sheltered location. 

Sunday, February 16, 2014

Water Heaters: Tank vs. Tankless

            Having hot water is more than just turning on a faucet in your home. Today, having the latest and greatest hot water systems has made it difficult for architects and remodelers. If we think about it, it’s easy to see why. Current homebuyers want homes that will “pay for themselves” in the long run in terms of efficiency and economical operation, and since water heating is the third-largest expense in a home, getting the best system is important.

            But what exactly is the “best system?” When it comes to water heating, there are two options, tank-style and tankless. Currently, tankless systems have been winning the appeal of homeowners throughout the US because they surpass the energy-efficiency of a traditional tank-style water heater. How? Well, unlike a tank-style system that has a reservoir of hot water, tankless (also known as “on demand”) water heaters activate only when you need them. When there is a demand for hot water somewhere in your home, cold water travels through the unit where a powerful heat exchanger transfers heat from heated coils to the water, quickly heating it to the desired temperature. On average, it is estimated that a tank-style system costs $230-285 a year to operate, while tankless systems have a average of $165-170.

            Even with their incredible energy efficiency and low operating cost, tankless systems aren’t necessarily the right choice for every homeowner. Below I’ve made a list of the Pros and Cons of both tank and tankless systems. Consider these factors before buying to ensure you’re buying the smartest choice for your home.

            TANK-STYLE WATER HEATERS:

PROS:

·        Traditional – This is a system that’s been around for years. It’s straightforward and gets the job done.
·        Inexpensive – Both the retail cost and installation cost are fairly inexpensive. Tank-style water heaters can cost under $300, while the most expensive tankless system can cost $1,700+.
·        Energy Star certified – Some models are now being stamped with the Energy Star seal of approval, so it is possible to save money on your heating bill with one of these more efficient systems.

CONS:

·        Always on – No matter how Energy Star efficient a model claims to be, the truth is these systems NEVER turn off. They’re constantly on, re-heating the water when the temperature drops and constantly using energy.
·        Bulky – This is especially noticeable in smaller homes, but these systems are much bigger and bulkier than tankless systems.
·        May not be enough – If you have teenagers living with you, you’ve probably woken up to experience cold showers. The truth is, this sort of system may be inadequate for larger or busier families, unable to supply as much hot water as needed.
·        Lower life expectancy – On average, this sort of system should last you anywhere from 12-15 years, which is less than a tankless system.


PROS:

·        Energy efficient – These systems can easily reduce your energy cost by up to 25% a year. Depending on which fuel source you get (propane, gas, or electric), you may be looking at 80-85% efficiency for gas models and 98+% efficiency for electric models.
·        Unlimited hot water – A tankless system can supply a virtually unlimited supply of hot water to your home at a rate of 2-5 gallons per minute. No more cold showers!
·        Compact – These systems can be very small, about the size of a small suitcase. In the case of electrical tankless water heaters, the size is even smaller and can fit in cabinets and under sinks.
·        Durable – Life expectancy is 20+ years.

CONS:

·        Expensive – Tankless systems can cause anywhere from $500-2,000. And that’s just retail price. If you go for a natural gas or propane fueled tankless system, installation cost is also expensive as they require intricate ductwork and vents, as well as new gas lines most of the time.
·        Replacement can be pricey – If you’re replacing whole-home unit to whole-home unit, a tankless unit replacement can be as pricey as $3,000 total. 

Monday, January 20, 2014

Installing your own Fireplace Insert - DIY Project

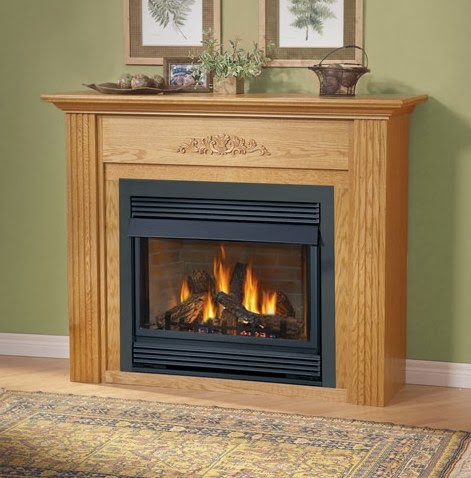
            If you’re looking to turn your old and drafty wood burning fireplace into a modern and efficient gas-powered fireplace, you’re in luck. Today we’ll be talking about how to install a fireplace insert to transform your fireplace into something that’s more eco-friendly, energy saving, and easy to maintain and use.

            Below, I’ve provided a step-by-step of how to install your new insert. If you think you might need some extra tools to help you get going, check out plumber’s stock for a large, discounted selection of HVAC equipment by clicking here. Keep in mind that this project will take you about 2 days to complete, so dedicate a weekend to work on it. Also keep in mind that when shopping for an insert, you’ll be looking to spend anywhere from $200 to $500.

1. Attach vent pipes – The first step in this installation process is to attach the vent pipes. You’ll want to use sheet metal screws to attach the vent pipes to the insert’s mounting plate. Make sure the exhaust pipe attaches to the exhaust outlet as well to decrease chance of carbon monoxide poisoning. 
2. Prep fireplace – Remove the existing fireplace damper and test fit the vent pipes into the chimney flue. Remove the ash cover to clear up space for the placement of your new insert. 
3. Install firebox – Attach the insert’s leveling legs and set the firebox in. Adjust the legs so the firebox is centered and level. 
4. Attach gas and electric lines – Since you’re going to be transforming an wood fireplace into a gas one, we’ll need to run gas and electric lines into the new insert. The gas will serve as the main fuel source while the electricity will work to power a fan. Please use caution, as working with gas and electricity is hazardous and can result in personal injury if done incorrectly. If you do not feel qualified to perform this step, call in a professional. 
5. Install the insert – Place the insert near the firebox and attach gas and electric lines to it according to the manufacturer’s instructions. Now slide the insert into the firebox, but be careful not to kink or bend the gas line. Position the mounting plate with the slots on top of the insert, lining up the vent pipes with the holes on the insert. Secure the sliding plate to the insert using a self-tapping screw. If necessary, adjust the leveling legs once more to make sure the entire unit is level. 
6. Accessories – This is easily my favorite part of the whole process, as you get to be creative about how you want your fire to look. Unhook the retaining clips from the bottom of the glass panel and carefully remove the glass. Place the embers inside the fireplace, spaced about ½ an inch apart. Place any larger pieces near the base to make the fire look more realistic. Scatter the ash around the edges of the burner plate, then place the ceramic logs inside. Replace the glass panel and clips. 
7. Install the receiver – Follow the manufacturer’s instructions to install the receiver for the remote control. Place the receiver outside the firebox to protect it from heat, then do a test run to make sure all the components are working. 
8. Install the surround – Last step! Slide the surround over the two tabs on the top of the fireplace unit. Use screws and attach the surround at the base of the insert. Install the screen over the surround’s glass front.

That’s all there is to it. A new and beautiful gas-powered fireplace is within your reach waiting for you to enjoy.

Tuesday, December 31, 2013

Kitchen Cabinetry - The Basics

            Your kitchen is a place where people gather together and make memories and food. It’s a place of comfort and warmth, fun and learning. Because your kitchen is such an important part of your home life, it should be a haven, a place where one can feel comfortable and which accurately reflects your (or your family’s) personality.

            One of the best ways to go about doing this is to have a nice looking kitchen. Cabinets tend to be the first thing people notice, followed by size and appliances. If you don’t like the way your kitchen looks now, try giving it a makeover. Today’s mini-DIY project focuses on your cabinets.

            If you don’t have enough money right now, it’s not a wise idea to try and switch out your cabinets, even if you dislike them. Instead, start with something smaller to change your kitchen’s look and feel a little bit.

            Changing your cabinet’s door handles can be a great way to personalize your kitchen and make it something more of what you want. There are many different styles of handle out there, and what you choose is entirely based on you. You could go with traditional and scour antique shops for the right vintage handle, or you could go sleek and modern and look for shiny chrome or stainless steel handles. You could go for whimsical and try and find unicorn, seahorse, or other animal handles. You could even go nerdy and look for Iron Man, Captain America, Superman, Batman, or other cool superhero or tv show logos.

            Regardless of what you pick, upgrading your cabinet’s handles can be a great way to personalize your kitchen while making it more of what you want it to be. This project can be done fairly quickly and requires little money and installation know-how.


            Have fun, be creative, and most importantly, happy holidays folks!